
O-5-117 Company Credit Card - Creating and Submitting Expense Report
🎯 PURPOSE
Adara Home Health issues company paid credit cards to certain employees who frequently have company expenses that are most conveniently paid by credit card. As laid out in this process, the credit card holder must enter expenses as they are made either through the Company Mileage website or via the Company Mileage App for cell phones. Then, they must compare the list of entered expenses to the credit card statements to ensure all items on the statement are on the company mileage expense report being submitted for approval.
Later, the supervisor to review will review and approve the monthly expense report as described in O-5-118 Company Credit Card Tie Out Approval.
🔄 PROCESS
| Table of Contents |
|---|
| Enter an Expense via the CompanyMileage Mobile Application (Suremobile) |
| Enter an Expense via the CompanyMileage Website |
| Compare Expenses in Company Mileage to Credit Card Statement |
Enter an Expense via the CompanyMileage Mobile Application (Suremobile)
An advantage of the mobile app is that you can take a picture of the receipt directly through the app.
NOTE: Screenshots of a mobile device in this process are from an Android device, but iOS (Apple) devices should be very similar.
- To install the mobile app:
- Go to the Google Play store or the Apple store.
-
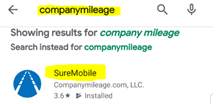
Search for Company Mileage and it will likely be the first option in the list; the mobile application is called SureMobile.
-
After installing the app, select its icon on your device to open the app.

-
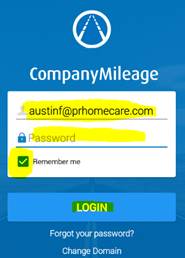
The first time you open the app, you will need to login with the same credentials used for accessing the CompanyMileage.com website. If you select the Remember me option, you will remain logged in and not need to continue entering this.
-
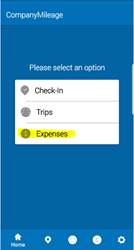
Once you are logged in, you will see a screen that presents three options. To enter a new expense, select Expenses. The other options are choices to manage expenses which have already been entered and are at various stages of approval.

-
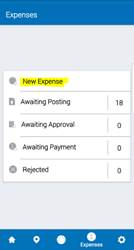
Select New Expense.
-
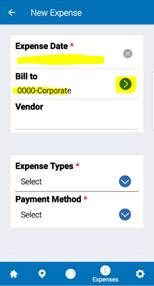
When the new expense screen opens, enter the date of the expense in the Expense Date field. Most users will have a default job location for the Bill to field and may not even have an option.
-
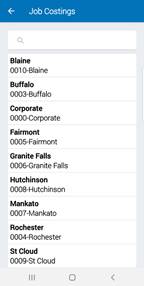
If you are a corporate employee or work in multiple offices, there may be a need to select and edit the Bill to field to the correct expense bucket.
-
-
Next enter in the name of the vendor for the expense in the Vendor field.
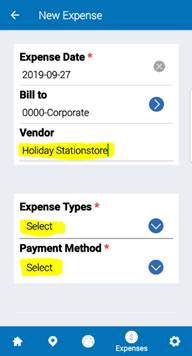
- Then select the Expense Type from the drop-down menu which most accurately describes the expense as this determines what GL account the cost will be assigned to.
-
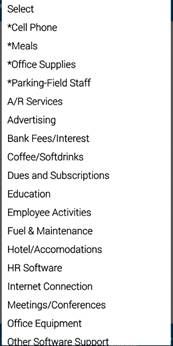
The most common types for field staff are preceded with a “*” in order to bring it to the top of the list.
- If an expense has multiple types of purchases within it, it will need to be broken out in to separate entries while using the same date, vendor name and receipt.
-
-
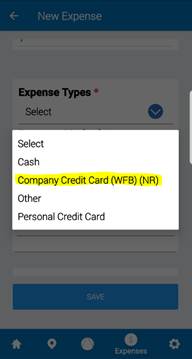
In the Payment Method drop-down menu, choose the option Company Credit Card (WFB)(NR) where the (NR) stands for “Not Reimbursed”. Be sure you select the correct option there as this selection determines if the expense will go to payroll for reimbursement.
-
In the Memo field, enter the specific reason for the expense.
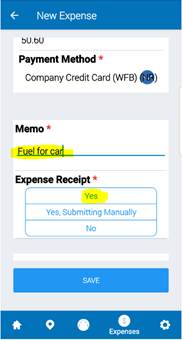
Example of fuel expense - The memo should describe the expense and also why it is a company expense. This should include information about who the expense was spent on as well as why.
- This is especially true for the Meals category as meals and entertainment receive special scrutiny from the IRS and are only 50% business expense deductible.
- Meals should list what employees were present and what qualifies it as a business expense. The only exceptions are large groups of employees where the purpose is obvious, for example meals for a large branch training where the attendees are recorded on a training attendance sheet elsewhere and its not practical to list them in this app. In this case just record the training so that we could reference the training attendance sheet as a supporting document.
- In the Expense Receipt field, select Yes.
-
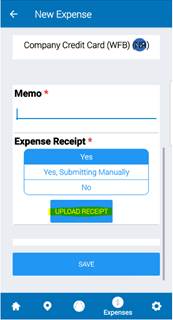
Next you will need to upload a receipt to the app as all expenses must have a receipt. Select UPLOAD RECEIPT when the option appears (after selecting Yes).
-
A window will pop up to ask you from where you wish to upload the receipt. In most cases, you will likely select the Camera option which will open your device’s camera (you would approve permission to access it if your device requests it).
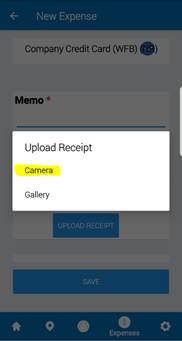
- If you don’t want to give the CompanyMileage app permission to access your camera or are unable to for some reason, the Gallery option is available to browse to the picture you have taken of the receipt outside the app or the pdf you may have downloaded.)
- When the camera feature opens, take a picture of the receipt and the app will show you the picture so you can make sure it is a clear picture of the entire receipt.
- If you cannot read the receipt, select the Retry option to take the picture again. If it looks good, select OK to return to the expense.
-
Once you have uploaded the receipt, you will be returned to the New Expense screen where you still have to select SAVE at the bottom of the screen to save the entire entry.
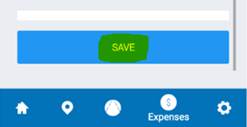
- This is a very important step. If you exit or close the app before doing so, the entire expense entry will be discarded. This is particularly problematic if you dispose of the receipt assuming it was uploaded.
-
If the expense was saved, the number of expenses on the main expense screen within the Awaiting Posting section will have increased by one.

- After the expense is recorded and awaiting posting, it can be left until it is ready to post.
Enter an Expense via the CompanyMileage Website
- To enter an expense is through the CompanyMileage website, first log in via a web browser.
-
Select the New Expense option from the top line menu bar in order to add an expense.

- Complete the fields as prompted:
- Expense Date: Enter the date of the expense.
- Bill to: Select the appropriate location if you are part of multiple offices.
- Vendor: Enter the vendor name.
- Expense Type: Select the expense type.
-
Payment Method: Enter the payment menthod.
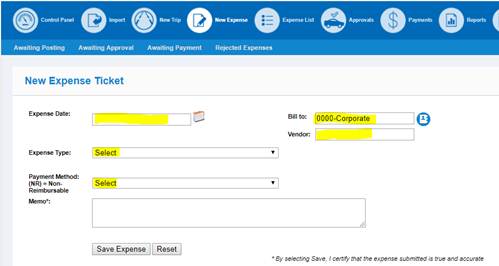
When completing these fields, if you need more details or are unsure of what goes in which field, please refer to the directions for the app above, which includes more details on these selections.
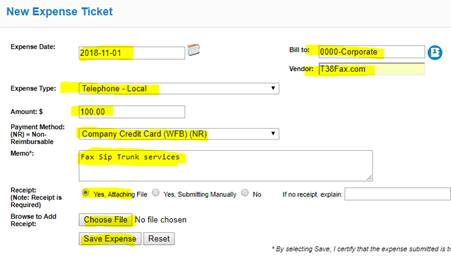
- In the Memo field, fill out a detailed memo about what the expense is and who it was for if applicable.
- Under the Receipt section, select the option Yes, Attaching File.
- Select Choose File to browse to the location you have the receipt saved and then upload it.
-
After all fields are complete, select Save Expense to finish the process.
Compare Expenses in Company Mileage to Credit Card Statement
- The last step of the Company Credit Card Tie Out process is comparing your entered expenses to your company credit card account statement and submitting an expense report that matches it.
- The list of expenses awaiting posting will include all the expenses that have not been posted to an expense report including those that are to be reimbursed (if any exist).
- Expenses that require reimbursement should be submitted on a separate expense report.
-
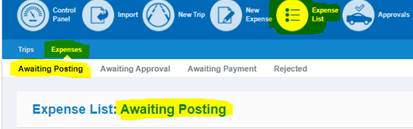
Log in to your account on CompanyMileage on your web browser and select the option Expense List from the top menu items.

-
Select the sub-menu of Expenses to see the different options for expense lists including the Awaiting Posting list we are looking for.
-
Open the applicable credit card statement.
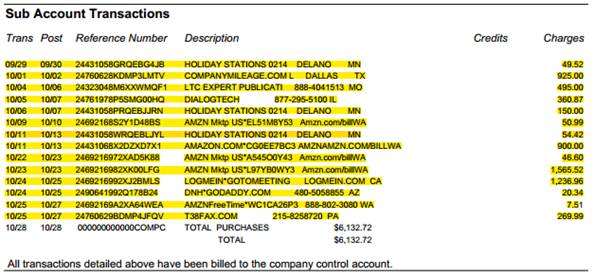
- Credit card statements typically close on the 27th or 28th of any given month, and the closing date will be listed at the top of the statement. This means your statement may include a transaction or two that are technically from the previous month.
- Compare the expenses on the credit card statement to the list of awaiting posting transactions that are entered and compare them for accuracy.
- Be sure there is an item in CompanyMileage for each line on the Wells Fargo statement.
- It is possible to edit an item that has been submitted on an expense report but you cannot add to it, so it is important to make sure that there are matching transactions before you Submit Expense Report.
-
As you verify items check the box next to them in CompanyMileage to include it in the expense report you are creating.
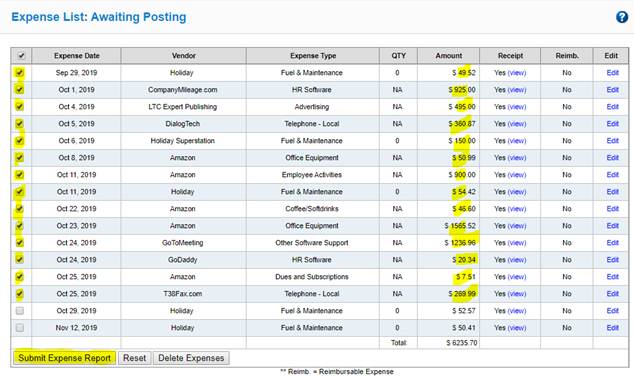
- It is likley there will be transactions in CompanyMileage that are part of the next Wells Fargo Statement. Be sure to exclude those from the expense report by not checking the box next to them.
- Once you have compared all the transactions and confirmed that they all match, select the Submit Expense Report button to create an expense report for the items checked.
-
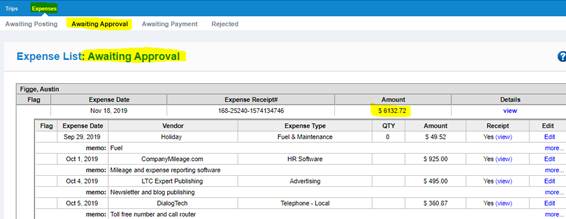
The expense will now appear under the Awaiting Approval tab for manager approval. The manager will complete this approval by following O-5-118 Company Credit Card Tie Out Approval.
📅 Effective: 01.21.2020 | 🛠️ Revised: 11.13.2026 | ✅ Approved: JFJ